Basic usage
Table of contents
Reading/writing
The central concept of UDon2 is a udon2.Node (later simply Node), which corresponds a node of the dependency tree. Dependency trees can be fed to UDon2 through files in the CoNLL-U format by using the snippet below. Each Node corresponds to one line of the file in the CoNLL-U format.
import udon2
# assumes that you have a file named 'test.conllu' with a valid CoNLL-U format
roots = udon2.ConllReader.read_file('test.conllu')
The roots variable is an instance of udon2.TreeList class containing Nodes corresponding to the root pseudonode of each dependency tree from test.conllu. TreeList has the same interface as Python’s default
To write the roots into the file, simply call:
udon2.ConllWriter.write_to_file(roots, 'your_name.conllu')
Note that ConllWriter currently allows to write only instance of TreeList class or individual Nodes.
Each node has a number of getters and setters, for each of the properties specified by CoNLL-U format (and for its parent) in the form n.<prop> and n.<prop> = x, where <prop> should be substituted by one of id, form, lemma, upos, xpos, misc, feats, deprel, parent. For instance, accessing or changing a universal POS-tag is as easy as: n.upos and n.upos = "ADJ" respectively. If you have all of the mentioned properties at hand, you can also create a new Node as follows.
n = Node(id, form, lemma, upos, xpos, feats, deprel, misc, parent_node)
str(n)      # returns <upos>|<deprel>|<form>
Getters and setters for misc and feats are a bit special, since their getters return udon2.FeatMap (has the same interface as Python’s dict), whereas setters require a string representation in the universal features format. Adding new values or altering the existing ones is done in the same way as with Python’s dictionaries.
node.feats                              # returns FeatMap
str(node.feats)                         # returns "Tense=Pres|VerbForm=Inf"
node.feats["Tense"] = "Past"
node.feats["Voice"] = "Act"
str(node.feats)                         # returns "Tense=Past|VerbForm=Inf|Voice=Act"
node.feats = "Tense=Pres|VerbForm=Sup"
str(node.feats)                         # returns "Tense=Pres|VerbForm=Sup"
To access children of the node, call node.children, which will return an instance of udon2.NodeList. Note that a setter is not available for children, instead you can use add_child and remove_child (see an example below with a Node n created earlier).
node.children       # returns a NodeList
node.add_child(n)
node.remove_child(n)
From v0.1b3
A new Importer class is available for reading dependency trees into UDon2. The first way of reading is from CoNLL-U files (effectively just calling ConllReader inside).
import udon2
# assumes that you have a file named 'test.conllu' with a valid CoNLL-U format
roots = udon2.Importer.from_conll_file('test.conllu')
The second way is by converting objects from Stanza, which a package serving models pre-trained on UD treebanks.
import stanza
import udon2

en = stanza.Pipeline(lang="en", processors='tokenize,lemma,pos,depparse')
roots = udon2.Importer.from_stanza(en("This is my first sentence.").to_dict())
Visualizing
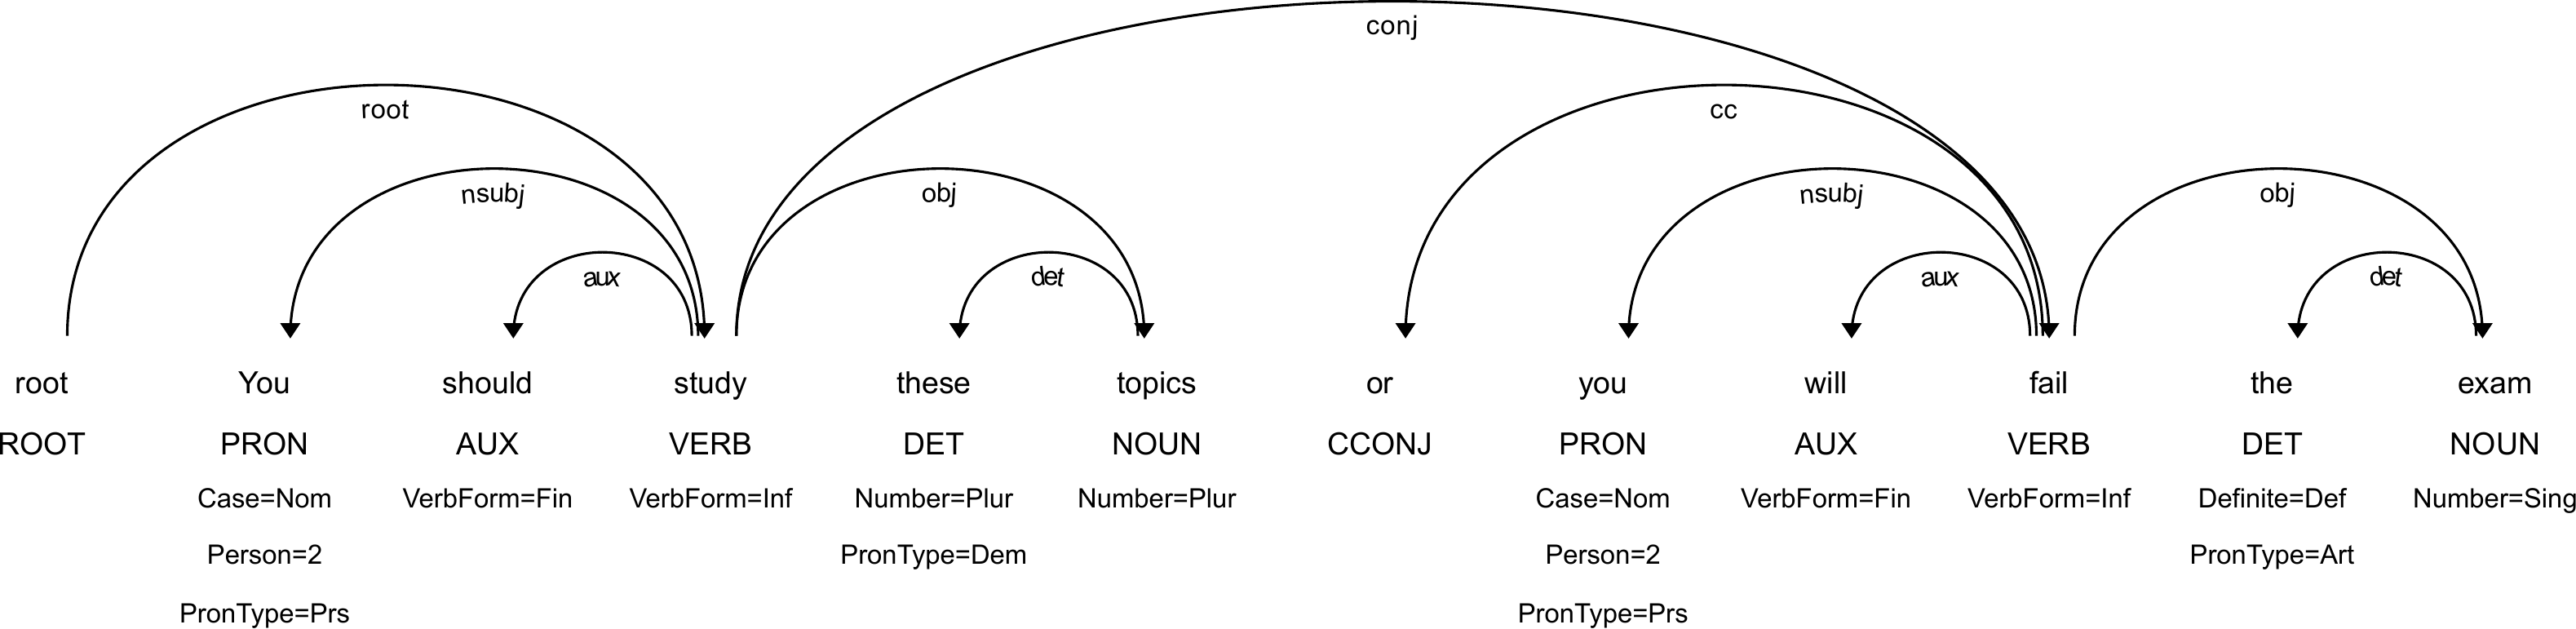
UDon2 is capable of visualizing the dependency tree and storing it as an SVG file (see example code snippet and a produced figure below).
from udon2.visual import render_dep_tree
render_dep_tree(node, "tree.svg") # node is an instance of udon2.Node
Other formats are currently not supported. However, your SVG image can then be converted to other formats using external tools. For instance, converting to PDF on Linux machines is a simple one-liner:
inkscape tree.svg --export-area-drawing --batch-process --export-type=pdf --export-filename=output.pdf
From v0.1b3
Now it is possible to customize plots by including optional arguments include_upos (True by default), include_xpos (False by default), include_ids (False by default) and include_feats (True by default) into the options dictionary of render_dep_tree. See examples of every argument below.
from udon2.visual import render_dep_tree
render_dep_tree(node, "with_xpos.svg", options={'include_xpos': True})

from udon2.visual import render_dep_tree
render_dep_tree(node, "without_feats.svg", options={'include_feats': False})

from udon2.visual import render_dep_tree
render_dep_tree(node, "with_ids.svg", options={'include_ids': True})

from udon2.visual import render_dep_tree
render_dep_tree(node, "with_all.svg", options={'include_ids': True, 'include_xpos': True})

Querying string features
Node class provides two basic methods for querying: select_by and get_by. Both methods require two arguments prop, a string specifying a property name (one of “upos”, “xpos”, “lemma”, “deprel”, “form”), and value, a value of this property for a Node to be selected. The main difference is that select_by will return ALL Nodes in the subtree induced by the current Node satisfying the condition, whereas get_by will return only immediate children.
To exemplify, consider running the following code snippet on the dependency tree visualized above, where the variable root contains the root pseudonode.
root.select_by("deprel", "obj")                # returns 2 Nodes: for the words "topics" and "exam"
root.get_by("deprel", "obj")                   # returns 0 Nodes: the only child's deprel is "root"
root.children[0].get_by("deprel", "obj")       # returns 1 Node: for the word "topics"
The other difference between the two methods is that select_by accepts one more optional argument negate, which equals to False by default. If switched to True, then all the nodes except those satisfying the condition will be returned.
# returns all nodes except the ones for the words "topics" and "exam"
root.select_by("deprel", "obj", True)
New in v0.1.0
You can now also use root.select_by("id", "7") to grab a node with the ID of 7.
Syntactic sugar
If you want to follow the chain of deprels, then two methods are available to your rescue: select_by_deprel_chain and get_by_deprel_chain (with the same difference as select_by and get_by, except no negate argument is available this time). Both functions take the only value as an argument, which is the dot-separated chain of deprels, e.g. “advcl:relcl.nmod.case”.
root.children[0].select_by_deprel_chain('obj.det')  # returns 2 Nodes: "these" and "the"
root.children[0].get_by_deprel_chain("obj.det")     # returns 1 Node: "these"
Querying key-value features
feats and misc are key-value features and hence it might not be that useful to query nodes having exactly the same features. Instead you might find more useful to query nodes having (or not) a certain set of key-value features. This can be achieved by the select_having method having exactly the same interface as select_by, but working only with prop being either “feat” or “misc” (an empty NoneList will be returned for other values). value should be in the universal format.
root.select_having("feats", "PronType=Prs|Person=2")       # returns 2 Nodes: "You" and "you"
root.select_having("feats", "PronType=Prs|Person=2", True) # returns all other nodes except "You" and "you"
Note that if negate equals to True, then all nodes without ALL specified features will be returned. This means that if a node is a partial match, it will still be returned.
Similarly, you can query if a given Node has a key-value feature by using one of has, has_all or has_any.
node = root.children[0].get_by_deprel_chain("nsubj")    # returns 1 Node: "You"
node.has("feats", "Case", "Nom")                        # True
node.has("feats", "Person", "3")                        # False
node.has_all("feats", "Person=2|PronType=Prs")          # True
node.has_all("feats", "Person=2")                       # True
node.has_any("feats", "Person=2|Person=3")              # True
Working with a linear order
Downstream application require frequent switches between a tree order and a linear order. UDon2 enables such switches with the help of two methods: linear and linear_sorted of a Node class. linear returns a NodeList with Nodes in the order of their appearance in the sentence, whereas linear_sorted returns them in a lexicographical order.
Syntactic sugar
A frequent application for a linear order is to get a text of the subtree induced by the given node in the same order as in the original sentence. This can be computed using node.get_subtree_text().
Checking projectivity
From v0.1b3
An arc of a dependency tree is called projective if there is a path from the head to every word between the head and the dependent. If all arcs are projective, then the whole dependency tree is called projective. For instance, trees, prented in the section about visualization are projective and the tree presented below is non-projective.
 Now it is possible to check whether a subtree induced by a
 Node n is projective simply by calling n.is_projective().